Hi girls!
I know you guys already noticed some quiet times here on my blog and I just have to tell you that I had to stop designing for my DT teams. I really am so sad about it, but I have to take responsibilities and make priorities and I have to pick school before hobbies.
I will keep on scrapping, just not as frequent as I wish I could!
xo Danielle
dinsdag 10 mei 2011
zondag 1 mei 2011
Once upon a sketch
Yourscrapbookstash is sponsering Once Upon a sketch! The talented Nadia just recently started the sketch blog and she is ROCKING it!!!
This is the sketch we had to work with:

Just love how the sketches look. So different and FUN!
And here is the layout I created using mostly products from my YSS monthly kit


Some Theresa Collins Timeless papers and Jenni Bowlin bingo cards... Also curio chipboard shapes from Basic Grey, Crate paper sticker and Jenni Bowlin ticket.
Go check out all the other work, it's AMAZING!!
Happy creating!
xo Danielle
zaterdag 30 april 2011
Time to see...
Well, getting a new kit from Yourscrapbookstash every month is a true pleasure.. Erica always picks the most gorgeous products. this month we were challenged to use paper for embellishments too.. and gosh.. well I have a HARD time doing that for sure! it's almost impossible! LOL i just love the embellishments out there way too much to skip them.
BUT I tried.
I received the beautiful Timeless papers from Theresa Collins and the Country Estate papers from websters pages. i know there are so many cut out possibilities, I just really suck at it! LOL
This time i also used the new sketch from sketchabilities. Sketch 46 is up and again Karan has outdone herself.. her sketches are the best and I love working with them!
This is the sketch:

Here is my layout:


It truly is a challenge to use paper as embellishments. You should try it! I hope you will play along with the sketch!
See you soon!
xo Danielle
woensdag 20 april 2011
Who you are.
Just a little reminder to remember who I am. To not pretend I am better or less then the person I am, because I am good enough to be me...


Again using the gorgeous papers from Websters pages Country Estate and some cut outs from Theresa Collins Timeless that was in my YSS kit this month. Also a Gypsy 45 card, Maya road chipboard butterflies, a doily, Echo park For the record sticker and Basic Grey Basics paper. I also used some yellow mist to represent the sun... and ofcourse some stickles to finish it off.
Hope you have a great day!!
xo Danielle
Hope you have a great day!!
xo Danielle
vrijdag 15 april 2011
Sketchabilities.. first layout!
Whooohooo! I am still so excited to be on the sketchabilities design team!! Our first month started and I can finally show you my very first layout using sketch nr 45. Karan is such an amazing sketch creator. I LOVE the layouts I create with them.
This is the sketch that is up right now:

And here is my layout:

I used the gorgeous papers from Websters pages Country Estate I got in my kit this month from yourscrapbookstash.com. LOVE them!! I also created this leaf swirl using my moms die cut machine. I think it turned out pretty cute!!
Go check out what the other talented DT members created with this sketch.. they are all so gorgeous!
Thank you so much for coming by!
xo Danielle
donderdag 14 april 2011
Guest designer at Creative Scrappers!
YIHAAAAA! I am back!
Spring days are here and I am enjoying my days with the boys outside and with Summer coming up I am spending nights in the gym and doing school work.. well I just really didn't had the energy and inspiration to scrap.. but I think I found my mojo back!!
I am a guest designer over at creative scrappers! I am SO honored and excited to be a guest designer. Thank you so much for having me over girls!!
This is the sketch we had to work with:

And this is the layout I created:

(sorry for the very bad photo)
I used the new Country Estate papers from Websters pages and actually did a cut out! whoohoo! LOL I just really am not good at cutting things out of paper.. give me some ready to go embellishments and I am good, but cutting out.. well not my thing I guess!
I absolutely loved working with the sketch and the CS design team did some amazing work as always!
Thanks for taking a peek!!
Again, thank you SO much Kristine for having me!!
xo Danielle
dinsdag 29 maart 2011
How to - create a dress form without sewing
Hi guys!
Well.. I can't sew.. let's just cut it short and be honest here... I have a really cute sewing machine standing on my desk here.. but all it does is collecting dust.. I tried! I tried really hard to make it work, it just doesn't.. The thread keeps breaking, I get frustrated, the thread disappears.. well just everything that can go wrong goes wrong and at the end I am left with what once was a beautiful layout, but now is pierced with holes that should be filled with thread.
When we received our monthly scrapbook kit from Erica at yourscrapbookstash.com, there were 2 Maya Road mini spools in it and we had a special assignment to do something fun with them.. since I am not the very best at creating altered project I wanted to have this done before starting on layouts so i thought and searched hard to get an idea of what to do with them.
I always LOVE the dress form people create out of fabric and was instantly surprised that this cute idea popped into my head. Why not make an altered dress form and use the mini spools as a stand for it. Why not make this dress form out of polystyrene?! YES! Well.. we just bought a new tv, so there was MORE THEN ENOUGH polystyrene.. LOL I could have made 100! ;)
So after searching for a dressform silhouette in google images I found a cute one and resized it into 5 inches high and 2.5 inches wide.
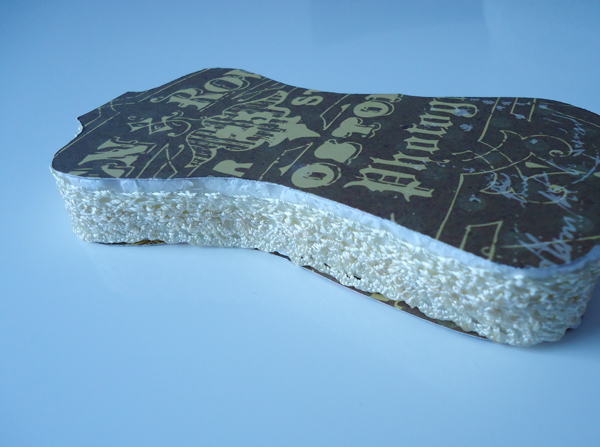
After that I put the print on some polystyrene and cut it out with a craft knife. It does make a huge mess, so it is best to do it over some garbage can or something similar.

Here is how it looks.
After that cut two of the same silhouettes out of your favorite paper. I used the Pink Paislee sweetness paper that was in my kit this month.
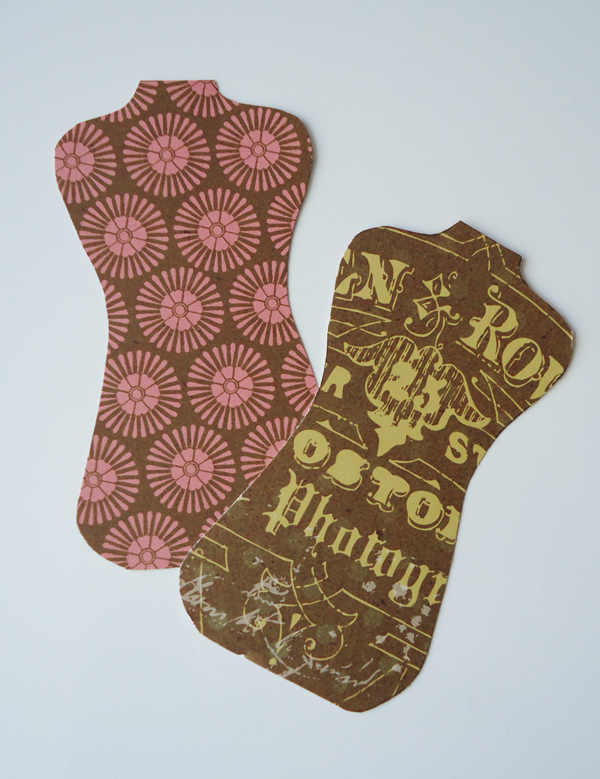
Glue these on both sides of the polystyrene dressform and voila. no sewing needed and a great base for your pins! LOL
To cover the polystyrene sides I added some gorgeous May arts lace.
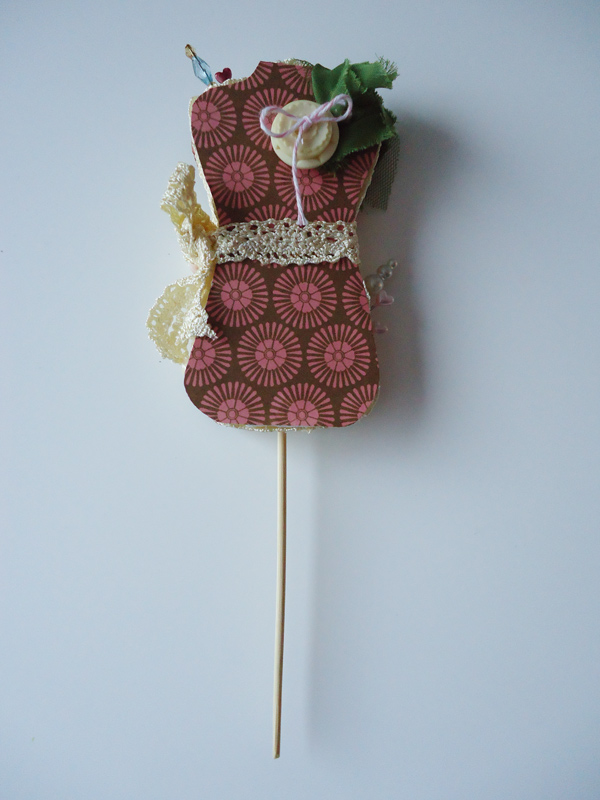
So then all we need is something to have it stand on. A wooden craft stick is a great solution AND it fits perfectly in the wooden spools we will be using for the base.

Now lets concentrate on making it prettttty! Use some of your favorite embellishments to create a nice look for her.

I used some Websters pages bloomers trim, some more May arts lace to create a bow, a vintage Jenni Bowlin button and some different pins from Maya Road to stuck in the sides of the dress form.
And ofcourse we need to embellish the other side too!
Also a vintage Jenni Bowlin button and some Jillibean Soup twine.
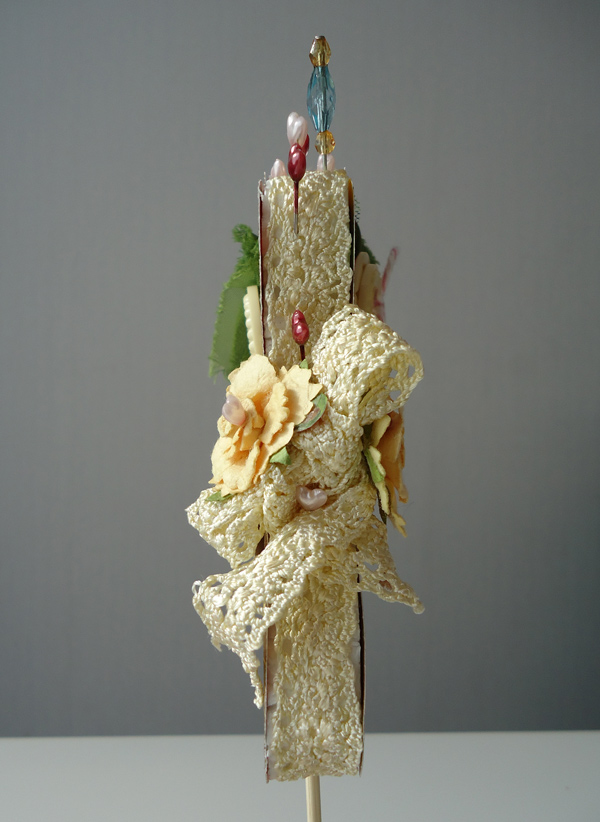
I also added 2 prima flowers to create a little extra dimension on the side. Stuck in some more pins... and called it done.
It was time to concentrate on the base.
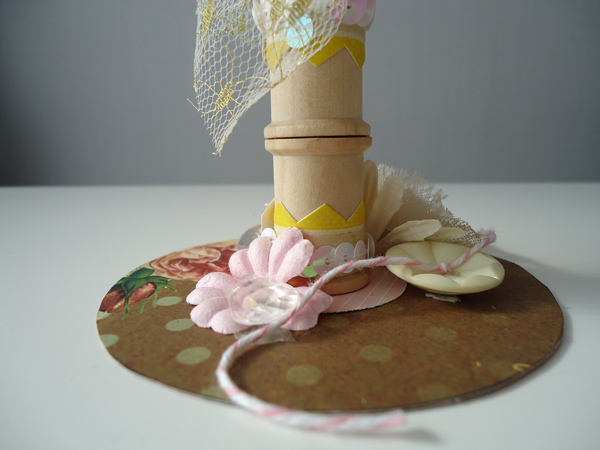
I cut out a large circle (3.5 inches to be exactly) and a small circle (1.5 inch). On there I glued my 2 wooden spools and embellished them with the border stickers from the sweetness collection from Pink Paislee. I also added some sequin trim. On top of the wooden spools I glued a little netting from Websters Pages and the base I embellished using another vintage Jenni Bowlin button, some Jillibean Soup twine, a Bo Bunny flower and a Prima flower. I also loved these Prima crystals, so I added 2 of these too.
after that it is just a matter of putting some glue on the wooden craft stick on the bottom and stick it in. I am thinking of making a polystyrene base so it stands more secure, but it works fine without it too.
and here is the result:

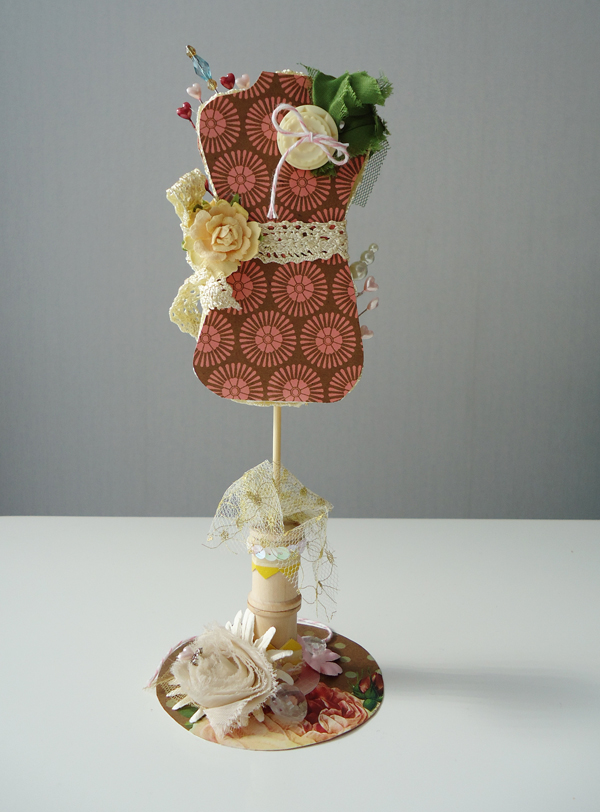


It's super easy and FUN! And I totally like how it looks on my desk. I am sticking in all the pins I have for some easy access and it makes me happy every time I look at it.
I hope you enjoyed this tutorial! Please let me know if you have any comments or questions and if you have made a dressform, please show me!! I would love to see it!
Happy creating!!
xo Danielle
Abonneren op:
Posts (Atom)